
Key Takeaways
- "Flipped teaching" supported by screencasts enables instructors to become facilitators of learning and avoid the sage-on-a-stage teaching approach.
- Existing PowerPoint presentations can be modified to create screencasts, which offer instructors greater versatility in developing lesson plans.
- Adding narration, music, sound effects, and video makes PowerPoint presentations much more engaging.
The "flipped classroom," which uses screencasts as the centerpiece of the methodology, has received a lot of attention recently in education and emerged as a popular teaching model. The concept is to flip, or reverse, the traditional teaching approach. As homework, students view an instructor's lecture or presentation via a video screencast containing specific content. Class time is reserved for answering questions, solving problems, and engaging in collaborative learning activities. Students come to class familiar with the content, more interested in the topic, and less likely to experience cognitive overload. Flipped teaching enables instructors to become facilitators of learning and avoid the sage-on-a-stage teaching approach, and it can be integrated across almost any curriculum. The key implementation component for the flipped classroom is, of course, the screencast video itself.1
Screencasting
Screencasts are an effective teaching tool that offers instructors greater versatility in developing lesson plans. Their many instructional applications include step-by-step process visuals, demonstrations, tutorials, and presentations. Students can watch a screencast video at their convenience, pausing and reviewing as often as needed.2 Screencasts can be designed to let students personalize their learning and highlight important information as they proceed at their own pace.3 Indeed, screencasting "has opened up . . . new ways of integrating classroom teaching and net-based learning."4
There are two ways to acquire screencast videos to use with a lesson:
- Find a screencast video that is already available from YouTube, Kahn Academy, neoK12, or other sources.
- Create and produce your own screencast.
Finding a video that fits a specific lesson can be time-consuming. Creating your own screencasts gives you a video that aligns with your lesson objectives, and it can be a very rewarding experience. Moreover, you can reuse them for future classes.
Screencasting is increasingly used to record PowerPoint presentations using software such as Camtasia Studio, which can enable an add-in to run the program from within PowerPoint.5 There are two general methods for creating an instructional screencast:
- Record a PowerPoint presentation with narration and add special effects, images, audio and video.
- Record the computer screen, provide narration, and use a digital pen to show for example a sequence of steps to solve a math or chemistry problem, in real time.
The captured presentation can be published online or used in classroom setting. This tutorial focuses on the steps to produce a PowerPoint screencast video applicable in both a flipped and a traditional classroom.
The Tools
Before creating your own screencast video, you'll need some tools to record your PowerPoint screencast. You will need a screencast software program, a microphone, a webcam, and an optional digital pen-tablet. All newer computers have a built-in microphone and a webcam; however, built-in microphones are not high quality, so I recommend a good USB microphone to record your narrations. Many screen-capturing programs are available—often free—for use with both Windows and Mac platforms. For guidance to screencasting software, check out Five Awesome Screencasting Tools and Screencasting software: Comparison and features. I prefer to use TechSmith Camtasia Studio, which is among the very best of the screencasting software programs. Camtasia lets you record on-screen activity and PowerPoint slides, add imported media (graphics, audio, and video), and publish to the web. Camtasia Studio also has excellent support tutorials, and users can share their content at no cost using Screencast.com.
A good way to start creating and producing a screencast is by recording a PowerPoint presentation. Teachers often have PowerPoint presentations that can be modified for this purpose. Start by adding narration; then add music, sound effects, video, and perhaps even special effects. You will be amazed by how much more engaging your PowerPoint presentation becomes. Creating a PowerPoint screencast involves four production steps: (1) planning and scripting, (2) recording, (3) editing, and (4) publishing. The example I use here to illustrate each of these steps is a PowerPoint (2010) screencast presentation on hurricanes. The screencast software is Camtasia Studio 8. Let's explore each production step.
Planning and Scripting
Select a presentation topic and determine the lesson objectives. You can create a new PowerPoint presentation or modify an existing one. When designing PowerPoint slides for a screencast, you will want to design or modify the slides with graphics and charts related to your topic and use text sparingly, because you do not want viewers to read the information on a slide. A PowerPoint screencast uses narration to explain a concept, chart, or graphic on the slide (figure 1).
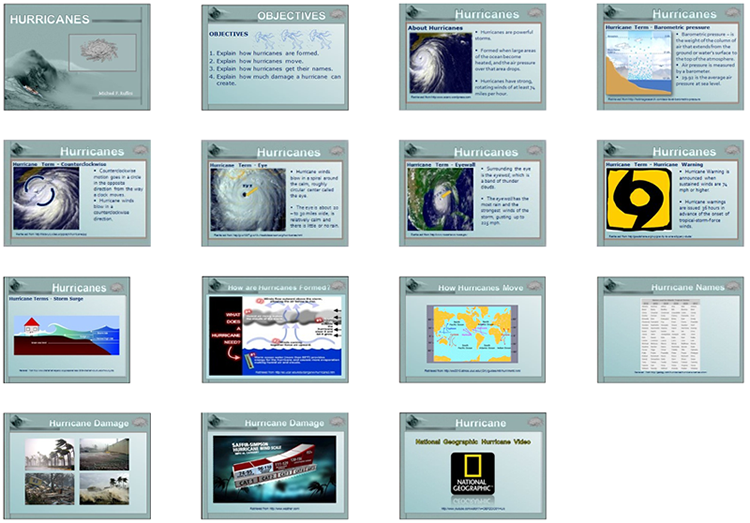
Figure 1. Slides designed for a screencast should include graphics and charts.
PowerPoint narration can be recorded with the presentation in real time or afterward during editing. The latter method is recommended because you can easily re-record the narration without re-recording the whole presentation. Experiment with each recording method. If you decide to record the narration after the presentation, you will have to set the transitions and the timing of the slides in advance to accommodate the narration's length.
To make a slide automatically advance after a certain amount of time, open your PowerPoint presentation, click the Transitions tab on the ribbon, and find the Advance Slide section at the far right (figure 2). By default, the slides are set to advance On Mouse Click. To make the slides advance automatically, uncheck the On Mouse Click box and check the After box. Then fill in the desired timing, say, 00:012:00 (12 seconds).

Figure 2. In the Transitions ribbon, set Advance Slide to the length of the narration.
PowerPoint has a pen annotation feature that lets you use the pointer to write or draw on the slide while the slide show is running (figure 3).

Figure 3. The InkTools feature in PowerPoint enables use of a pen or highlighter to emphasize items on slides.
If your pen annotation feature is not visible, try the following
- In PowerPoint, click File > Options > Customize Ribbon > choose Commands from dialog box > select All Commands.
- On the right-hand side, under Main Tabs > select the Home expand icon (+). Click the New Group button below > click Rename and rename it as Pens.
- On the left-hand side, search Pens under the All Commands list and click Add.
- Click OK.
- Click on the Home tab; the Pens feature is available as Pens tab.
- On the right-hand side, highlight the Home tab (you can select any tab; it's optional) > click the New Group button below > click Rename and rename it as Pens.
- On the left-hand side, search Pen under the All Commands list and click Add.
- Click OK and check.
Camtasia Studio has a PowerPoint add-in toolbar to record your presentation. To install the PowerPoint toolbar, open Camtasia, click on Tools in the Camtasia menu bar, and select Options. In the Options menu select the PowerPoint tab, choose Enable PowerPoint Add-in, and click OK (figure4).
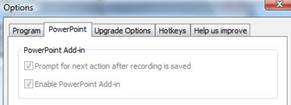
Figure 4. Install the PowerPoint toolbar in Camtasia Studio by checking Enable PowerPoint Add-in.
The finished product will likely be posted online, so be careful about copyright for any images and videos used. As a general rule, have a separate credits slide or post credit on individual slides; for more information on copyright, check out Education World copyright guidelines.
A script can help you organize everything you want to include in your screencast, such as action on the screen, narration, audio, special effects, and time for each slide transition (figure 5).
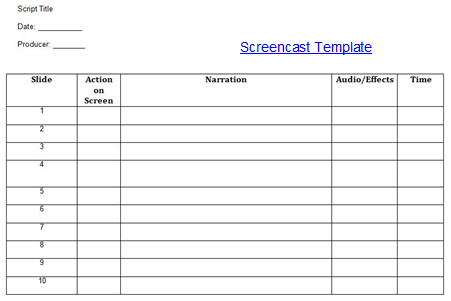
Figure 5. Elements of a screencasting script track the presentation slide by slide.
It's a good idea to script your narration and record it in your screencast, either by recording your narration during your PowerPoint presentation or afterward while editing. Scripting your presentation will avoid hmms and uhs, accidental sounds, long pauses, narration mistakes, and rambling.
Many instructors find that writing a script, or at least a bullet-point outline, helps them focus and organize desired content succinctly.6 If you can narrate your screencast using only bullet points, you may not need to script out exactly what you plan to say. Nevertheless, some speakers are more comfortable having a word-for-word script, which makes synchronizing the video with the narration much easier. When narrating a PowerPoint presentation, strive for a conversational style rather than a formal one.
Recording
Recording Overview

You have two options for recording your PowerPoint presentation: (1) from within PowerPoint or (2) from within Camtasia.
You can also record your narration with the presentation or afterward during editing. Here we record from within PowerPoint.
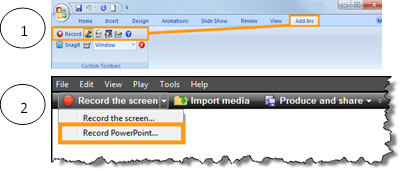
Step 1: Open PowerPoint and use the Camtasia Add-Ins. Open the presentation you are going to give and click on the Add-Ins tab. You will see the Camtasia Add-Ins toolbar.
Step 2: Record the narration with your PowerPoint presentation or
afterward in edit mode. Recording afterward is much easier because
editing lets you fix mistakes or add to the narration. You'll have to
experiment with both options and decide which is best for you.
Here are both methods.
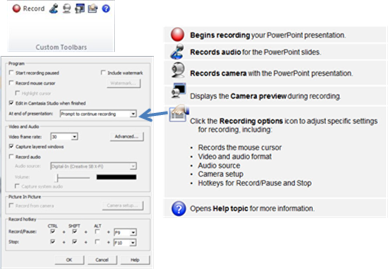
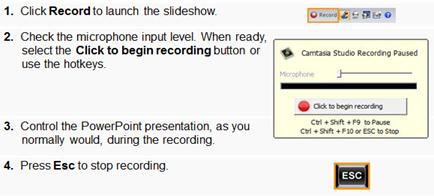
Record the presentation (1)
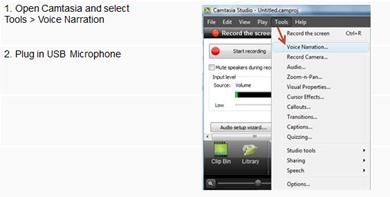
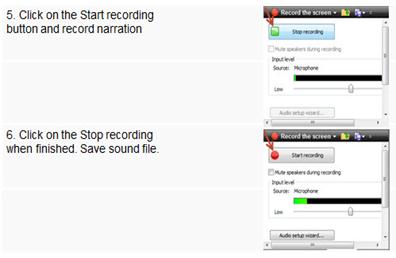
Record narration after PowerPoint recording (2)

Editing
When you reach the end of your PowerPoint recording you will be prompted to stop or continue the recording. The Continue Recording option lets you add items such as images, video, audio, quizzes, and special effects. For this example we will choose Stop Recording. After this selection you will be prompted to save your recording. Create a new folder to save your presentation; by default it will bear the name of your presentation followed by the file extension .camrec.
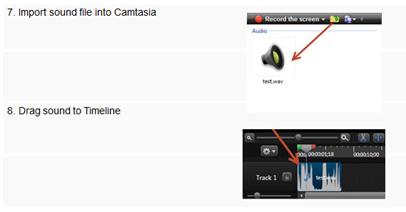
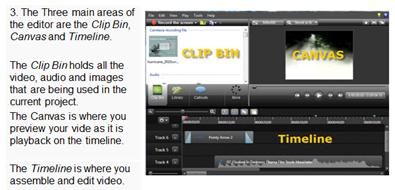
Use your folder for all added images and other media such as music, sound effects, and video. What you are saving is the Camtasia "camrec" file. Next you will be prompted to edit your recording if you want to add additional callouts, pan-and-zoom effects, title clips, more narration, music, sound effects, video or any of the many elements the Camtasia editing feature offers.

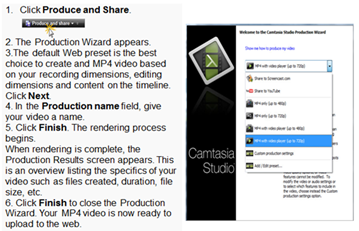
Producing a Screencast
The production process, also called rendering, creates an output file based on the sequence of video clips, audio clips, images, and effects on the timeline.
Preset production options contain settings optimized for popular distribution methods: Screencast.com, YouTube, the web, or mobile devices.
Conclusion
Although the growing use of screencasts may not pose a threat to Spielberg, Coppola, or Scorsese, I have found producing my own screencasts aligned with my course objectives can be creative and gratifying. They can be used as a supplement to a lesson or as the lesson itself, as in the flipped teaching model. In Camtasia you can add a quiz or survey to get student feedback on your video content. Screencasts can also add a new dimension to teaching and learning because they are motivational, multimodal, and engaging. Creating a screencast enables both educators and students alike to benefit from building their digital literacy skills. It seems clear that screencasting is a powerful, highly effective, and affordable learning tool that can facilitate learning across any curriculum area and accommodate any learning style. If you haven't tried creating a screencast, take the plunge and try it. I guarantee screencasting will be a part of your technology toolbox.
Screencast Resources
A practical guide to creating learning screencasts - 1
A practical guide to creating learning screencasts - 2
A practical guide to creating learning screencasts - 3
Common Elements of Effective Screencasts
Record a PowerPoint Presentation Using Camtasia
Screencasting Tips and Best Practices
10 Steps to Create a Marketing Video – Screencast
- Jonathan Bergmann and Aaron Sams, "Flip Your Classroom: Reach Every Student in Every Class Every Day," ISTE, 2012.
- Paul McGovern, "Screencasts and Education," The Screening Room, July 1, 2010.
- Catherine Sutton-Brady et al., "The Value of Using Short-Format Podcasts to Enhance Learning and Teaching," ALT-J: Research in Learning Technology, vol. 17, no. 3, November 2009.
- Simon B. Heilesen, "What Is the Academic Efficacy of Podcasting?" Computers & Education, vol. 55, May 31, 2010.
- Sandy Winterbottom, "Virtual Lecturing: Delivering Lectures Using Screencasting and Podcasting," Planet 18, June 2007.
- Beth Kanter, "An Introduction to Screencasting," TechSoup, April 25, 2007.
© 2012 Michael F. Ruffini. The text of this EDUCAUSE Review Online article is licensed under the Creative Commons Attribution-NonCommercial-NoDerivs 3.0 license.